
A few days ago, Paul Cornies tagged me in a meme to write a post on four favourite posts on my blog. I played about with Paint.net, a fantastic Web.2 image creating and editing tool, to make the image for the post. After splicing together bits of four images that I’d used on each of the selected posts, I managed to create some sort of collage.
When I published the post, I thought, “wouldn’t it be neat if I could link each part of the collage to its respective post?” The next day I did a few Google searches and found all I needed to help me with that idea.
You can inspect the result on the image collage of my previous post.
 Images, pixels
and coordinates
An image on a web page or blog post is made up of rows of coloured squares called pixels.
It is as if all the pixels of an image are lined up along streets that run parallel to one another.
Finding the exact position of a particular pixel could turn out to be a real headache if it weren’t for the two useful numerals called coordinates that can be assigned to each pixel.
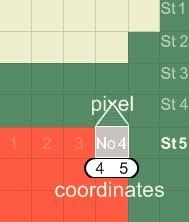
The first numeral is the house number of the pixel in its street.
The second numeral is the street name. So the coordinates of a pixel that lies at number 4
in street 5 is written as 4 5.
Usually there are hundreds of streets in an image, and hundreds of houses (pixels) in each street.
For instance, a pixel that lies at number 239 in street 117 will have
the coordinates 239 117.
Mapping a part of an image
Mapping a shape on part of an image is a bit like joining the dots.
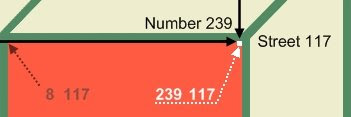
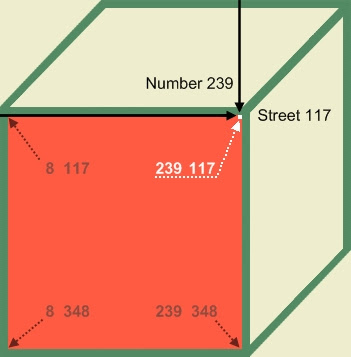
On the orange face of the cube shown below, the positions of pixels in each corner define its shape. There is a white pixel with coordinates 239 117 at the top right corner. The other three orange pixels are labelled.
All four pixels - 8 117, 239 117, 239 348 and 8 348 - map a square.
How do you find pixel coordinates in an image?
One of the sites I learnt about is Poor Person’s Image Mapper. Despite its ‘frugal’ title, it provides a rich means to help you see how image mapping works. You can easily map the pixels in an image.
All you need to do is to paste in the address (URL or location) of an image displayed in a post or web site. The Image Mapper returns the coordinates of any pixel on the image that you click.
You can use the image shown above for this. Copying the image location needs instructions dependent on the browser you use.
Listed here are methods for Firefox and Internet Explorer:
Firefox:Copy the image location.Internet Explorer:
- Right click on the image.
- Select Copy Image Location.
- Right click on the image.
- Select Properties.
- Copy the Address (URL) – make sure you copy all the data displayed as sometimes only part of the address is shown on right click – you may have to experiment with this.
Click this link to take you to the Image Mapper, paste in the copied address and submit it to see how the Mapper works. Clicking on parts of the displayed image will return the coordinates of pixels selected.
In part 2, I will show how you can link areas of an image to sites of your choice, using the coordinates obtained from the Image Mapper.


No comments:
Post a Comment