Showing posts with label html. Show all posts

Sunday, October 18, 2009

Image

Kia ora tātou – Hello Everyone
Open new window at Bentham Manor
The web image and how it operates are often misunderstood. Hypertext Mark-up Language, more commonly known as html, was invented to process text size, shape and colour on the Web.

When it was realised that html and related codes could be used to handle images, the Internet became a viable commercial medium.

The pixel
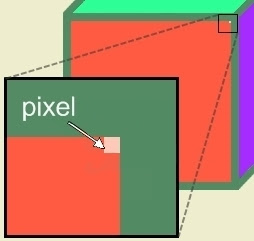
The Pixel
Close examination of images, on screen or when printed, shows that they are made up of many coloured spots, dots or squares. These are called pixels. The word pixel (picture-element pix-el) can also refer to the digital information associated directly with the coloured spot, held on a computer or transferred in a download.

What can be confusing is that ‘pixel’ is also used when referring to the smallest element that displays a single spot of coloured light on a monitor or TV screen. These tiny elements are permanent parts of the screen hardware. They are not the same as the pixels in the image that effect the display.

Image file size

A popular misconception is that the dimensions of an image, as it appears on the screen, are to do with the space the image occupies in computer memory or on disk. The term ‘image size’ can also be misleading, though this term refers to the capacity of an image to occupy space in computer memory or on disk. It’s more usual to refer to it as the image ‘file size’, measured in kilobytes or megabytes.

Image dimension
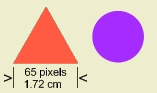
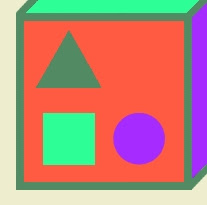
Coloured Shapes
The physical size of an image on the screen is another property that’s often misinterpreted or misunderstood. Images are really two dimensional things. Despite tricks of design, it’s not possible to have an image that is triangular, round or any shape other than rectangular, unless there is some distortional fault with the printer or screen.

An image has a height and a width, which make it easy to define its dimensions. These two lengths are measured in pixels, but can also be given in mm or cm. Though variation tends to be slight, the physical accuracy of image dimensions expressed in metric units varies with the equipment used to display the image.

Optimising image file size

Digital cameras can take pictures with file sizes of several megabytes. There has to be literally tens of millions of pixels in the files so that high quality pictures can be obtained. The fineness of detail that’s displayed from such images is particularly useful if they are to be printed in a large format or viewed with full screen in a picture viewer.
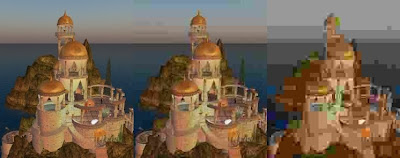
Image PixelationImages show how pixelation increases when file size is reduced

For most web purposes, however, image files of that order of size and quality are not necessary. What’s more, huge image files can occupy valuable resource space on the host site and cause unreasonably long upload or download times.

It’s often prudent to use some form of quality reduction. Adjusting the content of the image so that it gives a satisfactory display with a smaller file size is called optimisation, or optimising the image.

Most image hosting websites, including blogs and social network sites, optimise images automatically. If the images are satisfactorily optimised before uploading to the host site, it can save time, and in some instances be a cost saving too. Sue Waters’ excellent post on Uploading Photos From Digital Cameras Into Blog Posts gives great instruction on using several free packages for doing this.

Bitmapped images

The simplest way of arranging image information in a digital file is when each pixel carries its own information, as in a bitmap. This can be an inefficient way of packing image information, however, so bitmapped images tend to have larger file sizes than other image types of the same quality.

Compressed formats


JPEG, PNG or GIF type images use different systems of file compression. Pixel information that is duplicated, as can happen when the same colours are used over large areas of an image, is stored in a formula within the image file. The result is a smaller file size than that of the equivalent bitmapped file with the same image quality.


One advantage of the GIF compressed file type is that it can also include information on how separate image frames can be constructed. A special type of GIF file can display a cyclical series of frames like a looped movie – the so-called animated GIF.

Vector graphics

The introduction of vector graphic creation tools, such as Adobe Flash Writer, has brought new dimensions to image design and the way images can be displayed. Standard bitmapped images and related image types tend to break up, or pixelate, when enlarged on the screen.

What happens on display is that the information held in the image file is stretched over a larger area than was intended. The result is an image that appears to lose detail and sharpness and may look as if it is made up of chunks of colour, which is precisely how it is composed.

A vector image, on the other hand, does not lose its sharpness or detail when it is enlarged on the screen, simply
because there are no pixels in its image construction. True vector images tend to be limited to line diagrams and ones with solid areas of colour, however, and cannot be created from digital camera image files.

Ngā mihi nui – Best wishes

Saturday, July 18, 2009

Do-It-Yourself Image Mapping - part 2 of 2

Orange Circle
PixelIn part 1 of Do-It-Yourself Image Mapping, I explained how pixels in an image can be charted by their coordinates. Part 2 shows how a mapped section of an image can be used to link that part of the image to a site.

Following the instructions given here does not need a lot of technical know-how, but it does need an awareness of Hypertext Markup Language (html) and some recognition of its
quirks and symbols.

I do not recommend that you use the instructions in this post unless you have had a little experience in using the html editor on your blog posts.
For those who can forage through a plethora of tags in a page of html gobbledygook, and have understood the ideas presented in my previous post, here’s how to map part of an image and link it to a site.

Select a suitable image

Mapping an image permits areas within it to be coded so that they respond to a mouse-click by linking to a preselected site. The active area effectively becomes a hyperlink. The best images to use for this are those with clear-cut shapes or at least with geometrically shaped areas that are easily identified on the screen.

Publish your post first

Before an image can be mapped, the post must be published with the image that you’re going to use already in place. This makes it possible for you to copy the image location before using the Poor Person’s Image Mapper.

Html uses standard words and abbreviations to define the shape of the area that can be mapped. For instance, a rectangle or square shape on an image is coded rect. A circular shape is coded circle, and other geometrical shapes such triangles and polygons are coded poly.

Rectangular or square shapes are the easiest areas to map and link to a site by editing the html.

Cube
Squares and rectangles
new window link to Mapping Polygonal AreasNew window link to Mapping Circular Areas
View the published post and copy the location of the image you are about to map. Then use the Poor Person’s Image Mapper to find the exact coordinates of the corner pixels of the chosen square or rectangular shape on the displayed image.

Start with the top left pixel moving clockwise round the shape. Make a careful note of these coordinates. A typical list of recorded coordinates might look something like this:

8,117,239,117,239,348,8,348

Notice that the numerals are all separated by commas. The first two numerals 8,117 are the coordinates of the top left
pixel on the rectangle. What follows are three pairs of coordinates for the three other pixels, one in each of the remaining corners.

Using the html editor

When you have recorded the coordinates for the four pixels, the next step is to view the post in the html editor to inspect the code for the image.

To find the image in the html code of a post, you will need to look for the tag img src= followed by the address of the image in quotes. Using a search-and-find facility can help with this. Knowing the file name of the image also helps you to identify the code for the image, as this will appear in the last part of the image address. Code for a typical image might appear like this:

Code of this type usually begins with the tag div . . . which is really a signal to the browser that a block of related code is about to follow. It is always closed at some later position (not shown in the section of code above) in the html by the tag . . . /div. This is the signal to the browser that the end of the block of code is reached.

It pays to study a bit of code

Before editing the html code, you should identify the tags div . . . and
. . . /div for the image. You should also check that the image source tag img src= is followed immediately by the location of the image. This information should lie somewhere between the tag div and its associated tag /div. In the unlikely event that the
div tags are absent, and this can happen, it is important that you identify the parts of the code associated with the image you intend to map.

I recommend that you spend a few minutes running your eye over these parts of the code in the html of your post, making a mental note of roughly where they lie within the html code for the post.

Every map has a name

The map you define on the image need to be given a name that will form part of the code you edit. I’ve used the map name CUBE.

The html must then be edited by inserting the additional piece of code usemap="#CUBE" within the img src tag. This extra bit of code must follow after the image address that’s enclosed in quotes as shown below. Its function is to tell the browser what part of the image to make active.


Check your edited html. Any small typo will confuse the browser and may well display an error message when you attempt to publish the edited post.

Now locate the associated tag /div that lies further along the html code, and insert the code map name="CUBE" immediately after the tag as shown here:


The next part must be entered immediately after this last edit and on a new line. A single tap of the Enter key will bring down a new line. You can then enter the code for the mapped area and the site that it’s to be linked to:


Update 1/08/09: in Blogger the code "poly" is used instead of "rect"

Notice that I used the sample numbers for the coordinates here. You will have your own set of recorded numbers that you must use instead of these.

Also note that there are 3 sets of enclosed quotes in this bit of inserted code: "rect", "8,117,239,117,239,348,8,348" and "the address of the site" that the active area will link to on a click.

Check, check and check again

Check that you have entered the coordinates correctly at this stage. Between the quotes, there should be eight numerals and seven commas.

A further check on the address of the site that the area is to link to is recommended before republishing the post.

Publish the amended post

Once you have published your amended post, inspect the image by accessing the post in the browser.

Check that the area mapped actually links to the site you selected!
A further check can be made by moving the mouse, without clicking, over the mapped area and reading the site address displayed at the base of the browser window.

The displayed address should correspond to the site you selected. It is also a good way of checking the boundaries of the area in your image map. You can see how this works by rolling your mouse over the circle and triangle on the face of the cube in the image above.

Any error, such as a wrongly transferred numeral in a coordinate, will show when you perform this inspection. The symptom to look for is that the area you think you mapped does not respond by displaying the site address on the task bar when the mouse is moved entirely and only within that area.

Link to top section


Triangles and other straight-line shapes


Essentially the same method that’s outlined above applies to mapping a triangular or polygonal shape. The only real difference is the use of poly, instead of rect, for the area shape tag:

area shape="poly" coords=

Here’s a typical edit for a triangular shape:

Of course, if your shape maps a triangle or a polygonal shape other than one with four sides, you will have a different number of coordinate numerals. All shapes will have twice as many coordinate numerals as the number of sides enclosing the shape. This means that a triangular area will have 2 X 3 = 6 coordinate numerals, whereas a 5 sided shape will have 10 coordinate numerals.


Circles


A circular shape on an image requires you to record only the coordinates of the pixel at its centre, and the radius of the circle in pixels. Finding the rough centre of a circular area is easy. Finding its radius needs a careful eye followed by a simple calculation.

Suppose the centre pixel of a circular shape has it’s coordinates 35 38. It is an easy calculation to find its radius when the coordinates of the pixel at the top of the circle are also known. In this case the top pixel has coordinates 35 12, as in the above image.

A simple subtraction of the (street) coordinates gives the radius in pixels: 38 – 12 = 26. In this case, the radius is 26 pixels.

So to map a circular area you need to find the coordinates of its centre pixel and then the coordinates of the pixel at the top of the circle. Perform the calculation described above to find the radius in pixels.

The coding for mapping a circular shape is more or less the same as for the other shapes above with only a few minor differences.

Use circle, in the area shape tag area shape="circle" coords= . Enter the coordinates for the centre of the shape followed by the radius of the shape.

Here’s a typical edit for a circular shape with centre at 35 38 and radius 26 pixels:


Good luck with your image mapping.

Friday, July 17, 2009

Do-It-Yourself Image Mapping - part 1 of 2

Kia ora tātou – Hello EveryoneImage Maps
A few days ago, Paul Cornies tagged me in a meme to write a post on four favourite posts on my blog. I played about with Paint.net, a fantastic Web.2 image creating and editing tool, to make the image for the post. After splicing together bits of four images that I’d used on each of the selected posts, I managed to create some sort of collage.

When I published the post, I thought, “wouldn’t it be neat if I could link each part of the collage to its respective post?” The next day I did a few Google searches and found all I needed to help me with that idea.

You can inspect the result on the image collage of my previous post.

Tiny ImageImages, pixels
and coordinates


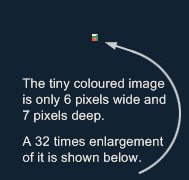
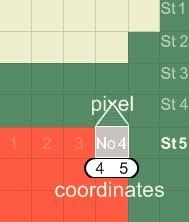
An image on a web page or blog post is made up of rows of coloured squares called pixels.

It is as if all the pixels of an image are lined up along streets that run parallel to one another.

Finding the exact position of a particular pixel could turn out to be a real headache if it weren’t for the two useful numerals called coordinates that can be assigned to each pixel.
Address of a Pixel
The first numeral is the house number of the pixel in its street.


The second numeral is the street name. So the coordinates of a pixel that lies at number 4
in street 5 is written as 4 5.

Usually there are hundreds of streets in an image, and hundreds of houses (pixels) in each street.

For instance, a pixel that lies at number 239 in street 117 will have
the coordinates 239 117.

Mapping a part of an image


Mapping a shape on part of an image is a bit like joining the dots.

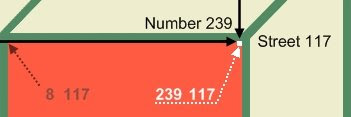
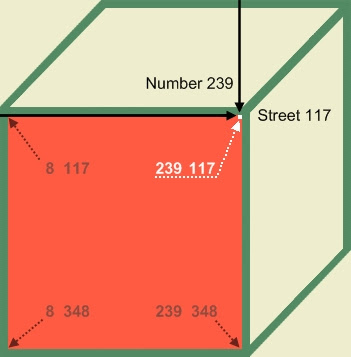
On the orange face of the cube shown below, the positions of pixels in each corner define its shape. There is a white pixel with coordinates 239 117
at the top right corner. The other three orange pixels are labelled.

All four pixels -
8 117, 239 117, 239 348 and 8 348 - map a square.

Image Cube
How do you find pixel coordinates in an image?


One of the sites I learnt about is Poor Person’s Image Mapper. Despite its ‘frugal’ title, it provides a rich means to help you see how image mapping works. You can easily map the pixels in an image.

All you need to do is to paste in the address (URL or location) of an image displayed in a post or web site. The Image Mapper returns the coordinates of any pixel on the image that you click.

You can use the image shown above for this. Copying the image location needs instructions dependent on the browser you use.
Listed here are methods for Firefox and Internet Explorer:
Firefox:
  1. Right click on the image.

  2. Select Copy Image Location.
Internet Explorer:
  1. Right click on the image.

  2. Select Properties.

  3. Copy the Address (URL) – make sure you copy all the data displayed as sometimes only part of the address is shown on right click – you may have to experiment with this.
Copy the image location.

Click this link to take you to the Image Mapper, paste in the copied address and submit it to see how the Mapper works. Clicking on parts of the displayed image will return the coordinates of
pixels selected.

In part 2, I will show how you can link areas of an image to sites of your choice, using the coordinates obtained from the Image Mapper.

Rangimarie - Peace in Harmony

Friday, January 30, 2009

Tractable Notepad

Tēnā koutou katoa – Greetings to you allTractable Notepad
Notepad, a simple text editor, has been released with all versions of MS Windows since 1985. I've been giving it a bit of airing recently. It’s one of those little apps that seem to have countless uses, simple as well as complex.

Easy and simple html:

Late last century, in my sojourn with html, I learnt that web builders often used Notepad directly to build web pages. This intrigued me. I’d realised that a file-extension had a function, and that in some files the extension could be changed without the screen exploding.

Someone who is well familiar with the ins-and-outs of html can open a Notepad file and type in text, adding their own html code to put in the formatting, such as font, colour, text-size etc. Of course, the code remains visible as code when the Notepad file is saved.

Notepad Showing Text
But by altering the file-extension (.txt) to .html, the file takes on a new function as web page, that’s recognised by the computer.

Useful elearning:

I’ve found this use of Notepad to be a valuable one-off measure for sending onto students active links to videos on the Internet. You can try this for yourself.

Browse to your favourite YouTube video. Copy the embed code that permits you to share the video. Open a Notepad file and paste in the embed code. It's also easy to add a caption or notes.

When you name and save the file, add the extension .html in place of the usual .txt . If you then examine the file, you’ll notice that it will be saved as a web page, as shown by its icon and file-extension .html .

Double clicking the new file opens it, but the code that was pasted in will not be displayed. Instead you will see the familiar start menu for your chosen video. Altering the file extension to .txt permits editing.

Html File from Notepad

The html file made this way can be sent as an email attachment, making it easy for the recipient to open and view the video contents immediately, provided there’s a connection to the Internet.


Obstinate files and Notepad:

Occasionally, Windows Explorer’s indexing prohibits a file from being deleted until the next time the system is started up. This can be frustrating, but you can often use Notepad to help you delete the file. Here’s how:

  1. Open Notepad and select File > Open

  2. check that Files of Type: is set to All Files,
    not Text Documents (*.txt)


  3. navigate to the location of the file to be deleted

  4. right-click on the file and choose Delete and follow through to delete the file

  5. empty the Recycle Bin.

Not a criticism of Notepad:

Something I learnt recently is that some people don’t like using Notepad. Perhaps it has earned this reputation from its peculiarities. Here’s an old one that I’ve only just come across.

Apparently there is a bug in the application that can be made evident by saving a Notepad file containing 2 three-letter words, 1 four-letter word and 1 five-letter word, in any order with single spaces in between. Example lines that do this when saved as the only data in the file are:

this app can break
edit the end error
Nero hid the facts

Choose your own four-letter name instead of Nero in the last example.
Provided the Enter key isn’t used at any time when entering any one of the text lines shown above, the text becomes invisible when the file is saved and is then re-opened. Not all words trigger the fault.

One line that I tried that didn’t disappear was: Good for USA Obama

I don’t think it’s a political plot. Check out WinCustomize.com.

Thought for the week:

If odd bugs are to be found in Microsoft Windows' simplest application, perhaps it’s best to take all the automatic updates!

Ka kite anō – Catch ya later

Sunday, January 25, 2009

Ship-shape and Bristol Fashion

Tēnā koutou katoa – Greetings to you all
Plimsoll Line On The Good Ship Blogger - artist ken allanPlimsoll Line on the Good Ship Blogger
Several miles inland, on the estuary of the English River Avon, is Bristol City, one of the oldest seaports in the world. It has been in use for over a thousand years. A consequence of Bristol’s geographical location is that it experiences extremely variable tidal flows. Water levels vary as much as 10 metres between tides.

Ships anchored at Bristol were stranded on the mud at low tide. Since they were beached twice a day, they needed to be built robustly to avoid damage. As well, cargo had to be securely stowed to prevent it being ruined by the severe movement incurred when a ship was repeatedly beached and then set afloat with the cycle of the tides.

It is believed that the term 'ship-shape and Bristol fashion' originated because of the critical specifications that ships had to meet before entering Bristol Harbour. Everything on board had to be secure, neat and orderly. In 1805, a floating harbour was built that prevented ships from being beached at low tide.


Ship-shape and Bristol fashion:

I was reminded of this phrase when I read Sue Waters’ advice to bloggers on not using MS Word when writing blog posts. The introduction of messy coding that’s often not seen by the writer, through the practice of copying from Word into the writer’s blog post, can cause problems.

It happens because of the presence of what’s known as html. It is carried across with the text when copying from Word. Sue rightly recommends ‘stripping’ the html by pasting the copied text into a Notepad file, and then copying the ‘cleaned’ text from there into the post. In this way, the html, that may well have been invisible to the unsuspecting writer, is left behind.

So what is html?


HyperText Markup Language sounds a bit of a mouthful. Its initialism, html, is far easier to remember. Html is a code that was developed in the early 1980s to permit the formatting of text for use in web pages. The so-called tags, marked by the < > signs, and code-words written in text form, permit size, colour, and font to be defined for a line of text.

While the actual text is easily recognised in html, the tags and other code-words tend to make it look like gobbledygook. When that’s carried across and pasted with the text into a blog post, it is sometimes displayed as gobbledygook. Not what a blogger wants to see in a newly published post!

Notepad - the html scrubber:

So why does Notepad not permit the html to be carried across? Notepad is really a very simple digital tool. A component of Microsoft Windows, it is the so-called ‘plain text editor’. Because it is so simple, it acts as a filter, so that only the text in a portion of copied data is recognised and accepted into the Notepad file. Presto! Anything that is then copied from the Notepad file will be just text.

The other splendid thing about Notepad is that it is a true WYSIWYG (What-You-See-Is-What-You-Get). So if there’s something in the text in Notepad that shouldn’t be there, you will see it. Not so with the hidden code in a Word file or text that you copy from a web page.

So why does web page text have code?

A web page invariably uses html for formatting its text. That’s what html is for after all. You can inspect this in a web page by right clicking on the text and selecting View Page Source. Try it on this page. Gobbledygook, right? Copying text from a web page can carry some of that gobbledygook across with the text and it can be pasted, with the entire messy html that you don’t want.

Text that’s copied from a web page can be cleaned of html by pasting into a Notepad file first. So, lesson well learnt. No more messy html.

From now on, we will have the content of our blog posts all ship-shape and Bristol fashion.


Ka kite anō – Catch ya later

Friday, August 29, 2008

For Bloggers Who Write Long Posts

Tēnā koutou katoa - Greetings to you all
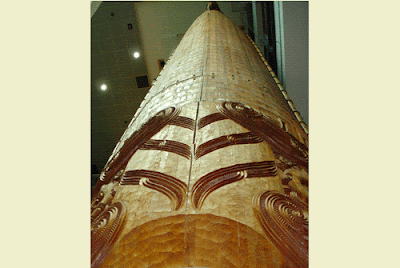
Māori totem, Sky Tower, Auckland, NZ
Have you ever written a post that was so long it needed to be split into sections? If you don’t mind experimenting a bit with the html editor, here’s a simple idea you may find useful. It permits you to include a menu, with links to annotated headings, like the one shown below, as well as Return-to-top links at convenient points throughout your post. You can try out these features here.

First write your post
Menu headings
Writing address labels
Markers
Editing html
Entering in the links
Linking to a section in another post

First write your post


You should really get your post into the shape you want to see it in when you publish. This means all the formatting, font sizing and colour, should be done, including writing the menu that you will want to attach links to later. Make sure you have a Return-to-top heading in some appropriate position at the foot of your post and at other suitable points throughout.

Menu headings

Use the text of the section headings so that they correspond to the items in the menu (in this post there are seven menu items). These will eventually carry the links that point to the corresponding marker tags placed in appropriate positions in the html of the post. Having done that, you can proceed to the next stage of writing the address labels
and marker tags.
Writing address labels

Inspect your list of menu headings and choose the first word from each heading as part of a label extension. It is important that no two labels are the same. So if this occurs, choose another appropriate word for one of the labels. Enter the # character followed immediate by the label name (no space). I entered the following list of label extensions for the sections in this post:
#first
#menu
#writing
#markers
#editing
#entering
#linking
#top
The extension #top is included for use in the Return-to-top links.

Markers

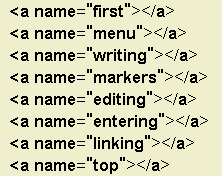
Using your list of labels, enter a list of marker tags in the Notepad file. Below is the list of marker tags that I entered for this post. Notice that there is no # in the label names.

A marker tag permits the browser to find the position requested when you click on the corresponding link.
Return-to-top

Editing html

Bloggers who are new to using the edit html facility can find this next part a bit daunting. It pays to spend some time looking around at the code first. I usually study the code before I do anything to it. If you inspect the html code of a post carefully, you may notice that some of it begins to make sense. Text, for instance, once located, will look similar to the text that appears on the post when in normal edit mode.

The markers for each section of your post must now be put into the html code. To do this you must put the draft post into Edit HTML mode so that you can inspect the code.

It is important that each marker is placed correctly and with the appropriate tags. Use the find text facility (Ctrl F) if you get stuck looking for a word in the html.

Put in the first marker. Place it immediately in front of the tag that corresponded to the first heading in the post as shown in the html code below (the marker tag is shown in blue - the heading text is shown highlighted).


Follow through by putting in the rest of the marker tags, ensuring that each is placed just in front of the tag that precedes the text for each heading. Remember to insert the marker tag for the Return-to-top links. This should be placed immediately before the tag that precedes the text of the first paragraph in the post.

Publish your post and view the new post in your browser. Look at the address line and scroll along to see the right hand end of the address. If you cannot see the name of your post, or part of it, you are not viewing the address of your post.

Make sure you have the new address of your post showing in the address line - each blog has its own way of showing this. Copy the address from the address line of your browser and paste it into the Notepad file. You will need this to create the links in the menu.

Entering the links

Copy the address of your post to a new line in the Notepad file and add the label extension for the first menu header.
The post address and the label extension make one address:

post address#label

For this post, the complete address for the first header, “First write your post”, looks like this:


All the addresses differ only in their label extensions. Adding the appropriate label extension to the address of the post makes the address for each of the headers. For instance, the address for the Return-to-top label for this post looks like this:


When you have completed the list of link addresses in Notepad, edit the published post and enter each address as a link for each of the corresponding menu headings, including any Return-to-top headings.
Job done, all you need to do is publish your post again.

Linking to a section in another post


You can link to a section in another post by adding the label extension for the section to the address of the post and using the resulting address in the link. For instance, the address for the section headed Editing html in this post is:


To see how this works, here is a link to a section
in a previous post headed Recent elearning.

Return-to-top

Ka kite anō - Catch ya later

Thursday, June 19, 2008

Down To Earth Web 2.0 in 1 Minute

Tēnā koutou katoa - Welcome to you all
This is definitely not rocket science, after all I'm still a rooky with all this, but it's a practice that I've used with Web 2.0 stuff for months.
While on The Comment Challenge recently, I found I had to refine the technique a bit. It is simply a way that I can quickly have at hand the tags or addresses that I may need. I can then copy and paste onto the blog when I write a comment without stabbing at the keyboard and possibly making more mistakes that way.

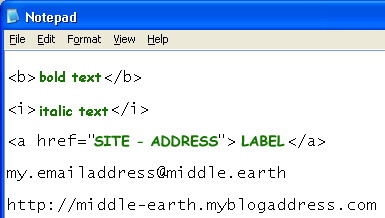
Notepad screendump
I have a Notepad file that I keep on my desktop. In it are listed my blog and email addresses for those annoying times I come across sites that don't default my blog site or email address. I also have a few html tags in it that I use as well as what I call the link formula when I want to include a link on a word or phrase that I enter in a comment.

Before I start writing a comment against a post, I open up the Notepad file and leave it open. If I'm writing a long comment I often enter it directly into a Word file and copy it from there into the Notepad file
to leave behind the unwanted html I may pick up from the Word file. I then cut and paste the comment from the Notepad file into the blog. The other tags and addresses are also there on the Notepad if I need them, or if I want to paste a link onto a word or phrase in the comment.

That's it! I timed it. It took 58 seconds.

( 8 ) ( 7 ) ( 6 ) ( 5 ) ( 4 ) ( 3 ) ( 2 ) << - other Web2.0Wednesday posts

Ka kite anō - Catch ya later