

Following the instructions given here does not need a lot of technical know-how, but it does need an awareness of Hypertext Markup Language (html) and some recognition of its quirks and symbols.
I do not recommend that you use the instructions in this post unless you have had a little experience in using the html editor on your blog posts.
For those who can forage through a plethora of tags in a page of html gobbledygook, and have understood the ideas presented in my previous post, here’s how to map part of an image and link it to a site.
Select a suitable image
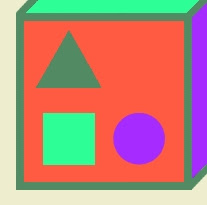
Mapping an image permits areas within it to be coded so that they respond to a mouse-click by linking to a preselected site. The active area effectively becomes a hyperlink. The best images to use for this are those with clear-cut shapes or at least with geometrically shaped areas that are easily identified on the screen.
Publish your post first
Before an image can be mapped, the post must be published with the image that you’re going to use already in place. This makes it possible for you to copy the image location before using the Poor Person’s Image Mapper.
Html uses standard words and abbreviations to define the shape of the area that can be mapped. For instance, a rectangle or square shape on an image is coded rect. A circular shape is coded circle, and other geometrical shapes such triangles and polygons are coded poly.
Rectangular or square shapes are the easiest areas to map and link to a site by editing the html.
Squares and rectangles
8,117,239,117,239,348,8,348
Notice that the numerals are all separated by commas. The first two numerals 8,117 are the coordinates of the top left pixel on the rectangle. What follows are three pairs of coordinates for the three other pixels, one in each of the remaining corners.
Using the html editor
When you have recorded the coordinates for the four pixels, the next step is to view the post in the html editor to inspect the code for the image.
To find the image in the html code of a post, you will need to look for the tag img src= followed by the address of the image in quotes. Using a search-and-find facility can help with this. Knowing the file name of the image also helps you to identify the code for the image, as this will appear in the last part of the image address. Code for a typical image might appear like this:
 Code of this type usually begins with the tag div . . . which is really a signal to the browser that a block of related code is about to follow. It is always closed at some later position (not shown in the section of code above) in the html by the tag . . . /div. This is the signal to the browser that the end of the block of code is reached.
It pays to study a bit of code
Before editing the html code, you should identify the tags div . . . and
. . . /div for the image. You should also check that the image source tag img src= is followed immediately by the location of the image. This information should lie somewhere between the tag div and its associated tag /div. In the unlikely event that the div tags are absent, and this can happen, it is important that you identify the parts of the code associated with the image you intend to map.
I recommend that you spend a few minutes running your eye over these parts of the code in the html of your post, making a mental note of roughly where they lie within the html code for the post.
Every map has a name
The map you define on the image need to be given a name that will form part of the code you edit. I’ve used the map name CUBE.
The html must then be edited by inserting the additional piece of code usemap="#CUBE" within the img src tag. This extra bit of code must follow after the image address that’s enclosed in quotes as shown below. Its function is to tell the browser what part of the image to make active.

Check your edited html. Any small typo will confuse the browser and may well display an error message when you attempt to publish the edited post.
Now locate the associated tag /div that lies further along the html code, and insert the code map name="CUBE" immediately after the tag as shown here:

The next part must be entered immediately after this last edit and on a new line. A single tap of the Enter key will bring down a new line. You can then enter the code for the mapped area and the site that it’s to be linked to:

Update 1/08/09: in Blogger the code "poly" is used instead of "rect"
Notice that I used the sample numbers for the coordinates here. You will have your own set of recorded numbers that you must use instead of these.
Also note that there are 3 sets of enclosed quotes in this bit of inserted code: "rect", "8,117,239,117,239,348,8,348" and "the address of the site" that the active area will link to on a click.
Check, check and check again
Check that you have entered the coordinates correctly at this stage. Between the quotes, there should be eight numerals and seven commas.
A further check on the address of the site that the area is to link to is recommended before republishing the post.
Publish the amended post
Once you have published your amended post, inspect the image by accessing the post in the browser.
Check that the area mapped actually links to the site you selected!
A further check can be made by moving the mouse, without clicking, over the mapped area and reading the site address displayed at the base of the browser window.
The displayed address should correspond to the site you selected. It is also a good way of checking the boundaries of the area in your image map. You can see how this works by rolling your mouse over the circle and triangle on the face of the cube in the image above.
Any error, such as a wrongly transferred numeral in a coordinate, will show when you perform this inspection. The symptom to look for is that the area you think you mapped does not respond by displaying the site address on the task bar when the mouse is moved entirely and only within that area.

Triangles and other straight-line shapes
Essentially the same method that’s outlined above applies to mapping a triangular or polygonal shape. The only real difference is the use of poly, instead of rect, for the area shape tag:
area shape="poly" coords=
Here’s a typical edit for a triangular shape:
 Of course, if your shape maps a triangle or a polygonal shape other than one with four sides, you will have a different number of coordinate numerals. All shapes will have twice as many coordinate numerals as the number of sides enclosing the shape. This means that a triangular area will have 2 X 3 = 6 coordinate numerals, whereas a 5 sided shape will have 10 coordinate numerals.
Circles
A circular shape on an image requires you to record only the coordinates of the pixel at its centre, and the radius of the circle in pixels. Finding the rough centre of a circular area is easy. Finding its radius needs a careful eye followed by a simple calculation.
Suppose the centre pixel of a circular shape has it’s coordinates 35 38. It is an easy calculation to find its radius when the coordinates of the pixel at the top of the circle are also known. In this case the top pixel has coordinates 35 12, as in the above image.
A simple subtraction of the (street) coordinates gives the radius in pixels: 38 – 12 = 26. In this case, the radius is 26 pixels.
So to map a circular area you need to find the coordinates of its centre pixel and then the coordinates of the pixel at the top of the circle. Perform the calculation described above to find the radius in pixels.
The coding for mapping a circular shape is more or less the same as for the other shapes above with only a few minor differences.
Use circle, in the area shape tag area shape="circle" coords= . Enter the coordinates for the centre of the shape followed by the radius of the shape.
Here’s a typical edit for a circular shape with centre at 35 38 and radius 26 pixels:

Good luck with your image mapping.


3 comments:
Great advices, i was trying to make some mapping before. But i cannot, but will try these steps. Thanks!
Haere mai Anthony!
Let us know how you get on - it's always good to get this sort of feedback.
Catchya later
Nice one
thanks bro. it helped me alot. thankssssssssssssssss!!!!!!!!!!!!!!!!!!!!!!!!!!!!!!!!!!!!!!!!!!!!!
Post a Comment