Have you ever written a post that was so long it needed to be split into sections? If you don’t mind experimenting a bit with the html editor, here’s a simple idea you may find useful. It permits you to include a menu, with links to annotated headings, like the one shown below, as well as Return-to-top links at convenient points throughout your post. You can try out these features here.
First write your post
Menu headings
Writing address labels
Markers
Editing html
Entering in the links
Linking to a section in another post
First write your post
You should really get your post into the shape you want to see it in when you publish. This means all the formatting, font sizing and colour, should be done, including writing the menu that you will want to attach links to later. Make sure you have a Return-to-top heading in some appropriate position at the foot of your post and at other suitable points throughout.
Menu headings
Use the text of the section headings so that they correspond to the items in the menu (in this post there are seven menu items). These will eventually carry the links that point to the corresponding marker tags placed in appropriate positions in the html of the post. Having done that, you can proceed to the next stage of writing the address labels and marker tags.
Writing address labels
Inspect your list of menu headings and choose the first word from each heading as part of a label extension. It is important that no two labels are the same. So if this occurs, choose another appropriate word for one of the labels. Enter the # character followed immediate by the label name (no space). I entered the following list of label extensions for the sections in this post:
#firstThe extension #top is included for use in the Return-to-top links.
#menu
#writing
#markers
#editing
#entering
#linking
#top
Markers
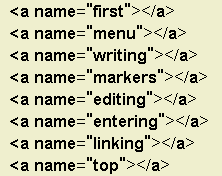
Using your list of labels, enter a list of marker tags in the Notepad file. Below is the list of marker tags that I entered for this post. Notice that there is no # in the label names.
 A marker tag permits the browser to find the position requested when you click on the corresponding link.
Bloggers who are new to using the edit html facility can find this next part a bit daunting. It pays to spend some time looking around at the code first. I usually study the code before I do anything to it. If you inspect the html code of a post carefully, you may notice that some of it begins to make sense. Text, for instance, once located, will look similar to the text that appears on the post when in normal edit mode.
The markers for each section of your post must now be put into the html code. To do this you must put the draft post into Edit HTML mode so that you can inspect the code.
It is important that each marker is placed correctly and with the appropriate tags. Use the find text facility (Ctrl F) if you get stuck looking for a word in the html.
Put in the first marker. Place it immediately in front of the tag that corresponded to the first heading in the post as shown in the html code below (the marker tag is shown in blue - the heading text is shown highlighted).
Follow through by putting in the rest of the marker tags, ensuring that each is placed just in front of the tag that precedes the text for each heading. Remember to insert the marker tag for the Return-to-top links. This should be placed immediately before the tag that precedes the text of the first paragraph in the post.
Publish your post and view the new post in your browser. Look at the address line and scroll along to see the right hand end of the address. If you cannot see the name of your post, or part of it, you are not viewing the address of your post.
Make sure you have the new address of your post showing in the address line - each blog has its own way of showing this. Copy the address from the address line of your browser and paste it into the Notepad file. You will need this to create the links in the menu.
Entering the links
Copy the address of your post to a new line in the Notepad file and add the label extension for the first menu header. The post address and the label extension make one address:
post address#label
For this post, the complete address for the first header, “First write your post”, looks like this:

All the addresses differ only in their label extensions. Adding the appropriate label extension to the address of the post makes the address for each of the headers. For instance, the address for the Return-to-top label for this post looks like this:

When you have completed the list of link addresses in Notepad, edit the published post and enter each address as a link for each of the corresponding menu headings, including any Return-to-top headings. Job done, all you need to do is publish your post again.
Linking to a section in another post
You can link to a section in another post by adding the label extension for the section to the address of the post and using the resulting address in the link. For instance, the address for the section headed Editing html in this post is:


2 comments:
Nice "how to" Ken! Thanks! I'm glad and lucky to have met you in NZ and am now following you online!
Haere mai Nancy!
It is a pleasure to welcome you to my blog. I guess your ears are still buzzing with the talk of Gustav - thank goodness it turned out to be a fizzer!
Ka kite
Post a Comment